加载中...
不想等待可以点我关掉

查看Intel CPU信息

使用i7z

1
2
sudo apt install i7z
sudo i7z

压缩存档

  1. 实际操作是在远端SMB服务器上运行,先使用Rclone挂载到本地:rclone mount nas: /mount/nas-mount --vfs-cache-mode minimal --vfs-read-chunk-size 64M --vfs-read-chunk-size-limit 2G --allow-other
  2. 压缩:
1
2
tar -c -C "/mount/nas-mount/111" original \
| xz -9 -T0 > "/mount/nas-mount/111.tar.xz"

报错类

dpkg

1
2
3
4
dpkg: warning: 'ldconfig' not found in PATH or not executable
dpkg: warning: 'start-stop-daemon' not found in PATH or not executable
dpkg: error: 2 expected programs not found in PATH or not executable
Note: root's PATH should usually contain /usr/local/sbin, /usr/sbin and /sbin

(临时)更新PATH环境变量:

1
export PATH=$PATH:/usr/local/sbin:/usr/sbin:/sbin

缺少依赖

1
sudo apt-get install -f

-f选项会尝试修复系统上未满足的依赖关系。

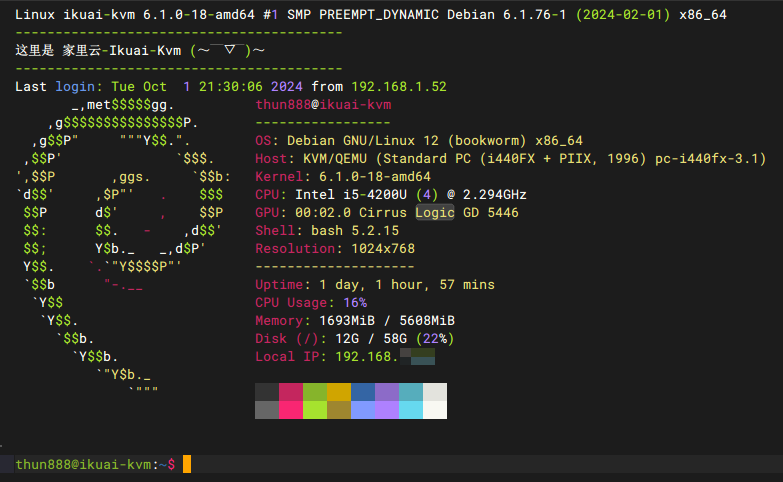
Neofetch

~/.config/neofetch/config.conf
1
2
3
4
5
6
7
8
9
10
11
12
13
14
15
16
17
18
19
20
21
22
23
24
25
26
27
28
29
30
31
32
33
34
35
36
37
38
39
40
41
42
43
44
# See this wiki page for more info:
# https://github.com/dylanaraps/neofetch/wiki/Customizing-Info
print_info() {
info title
info underline

info "OS" distro
info "Host" model
info "Kernel" kernel
info "CPU" cpu
info "GPU" gpu

info "Shell" shell
info "Resolution" resolution

info underline

info "Uptime" uptime
# info "Packages" packages
info "DE" de
info "WM" wm
info "WM Theme" wm_theme
info "Theme" theme
info "Icons" icons
# info "Terminal" term
info "Terminal Font" term_font
info "CPU Usage" cpu_usage
info "Memory" memory

# info "GPU Driver" gpu_driver # Linux/macOS only
info "Disk" disk
# info "Battery" battery
# info "Font" font
# info "Song" song
# [[ "$player" ]] && prin "Music Player" "$player"
info "Local IP" local_ip
# info "Public IP" public_ip
# info "Users" users
# info "Locale" locale # This only works on glibc systems.

info cols
}

...... to be full of default config

ps: 修改motd

$

样式
样式

PVE

使用本地时间进行RTC: timedatectl set-local-rtc yes

维护

1
2
3
4
5
6
7
8
9
10
11
12
13
14
15
16
17
18
19
20
21
22
23
24
25
26
27
28
29
30
31
32
33
34
35
36
37
38
39
40
41
42
43
44
45
46
47
48
49
50
51
52
53
54
55
56
57
58
59
60
61
62
63
64
65
66
67
68
69
70
71
72
73
74
#换源:https://mirrors.tuna.tsinghua.edu.cn/help/debian/
nano /etc/apt/sources.list
# 默认注释了源码镜像以提高 apt update 速度,如有需要可自行取消注释
deb https://mirrors.tuna.tsinghua.edu.cn/debian/ bookworm main contrib non-free non-free-firmware
# deb-src https://mirrors.tuna.tsinghua.edu.cn/debian/ bookworm main contrib non-free non-free-firmware

deb https://mirrors.tuna.tsinghua.edu.cn/debian/ bookworm-updates main contrib non-free non-free-firmware
# deb-src https://mirrors.tuna.tsinghua.edu.cn/debian/ bookworm-updates main contrib non-free non-free-firmware

deb https://mirrors.tuna.tsinghua.edu.cn/debian/ bookworm-backports main contrib non-free non-free-firmware
# deb-src https://mirrors.tuna.tsinghua.edu.cn/debian/ bookworm-backports main contrib non-free non-free-firmware

# 以下安全更新软件源包含了官方源与镜像站配置,如有需要可自行修改注释切换
deb https://mirrors.tuna.tsinghua.edu.cn/debian-security bookworm-security main contrib non-free non-free-firmware
# deb-src https://mirrors.tuna.tsinghua.edu.cn/debian-security bookworm-security main contrib non-free non-free-firmware


#安装部分系统工具
apt install wget curl unzip sudo -y
#给予sudo权限
nano /etc/sudoers

#安装管理面板
HAOZI_DL_URL="https://dl.cdn.haozi.net/panel"; curl -sSL -O ${HAOZI_DL_URL}/install_panel.sh && curl -sSL -O ${HAOZI_DL_URL}/install_panel.sh.checksum.txt && sha256sum -c install_panel.sh.checksum.txt && bash install_panel.sh || echo "Checksum 验证失败,文件可能被篡改,已终止操作"

安装插件 系统工具箱
安装插件 Podman
安装插件 Supervisor
安装插件 Redis
安装插件 MySQL-5.7
安装插件 PHP-8.1
安装插件 OpenResty
安装插件 phpMyAdmin(需等待前者完毕)
安装插件 Pure-FTPd
安装插件 Frp

#安装DDNS—GO
wget https://cfproxy.hzchu.top/https://github.com/jeessy2/ddns-go/releases/download/v6.7.0/ddns-go_6.7.0_linux_x86_64.tar.gz
tar xzvf ddns-go_6.7.0_linux_x86_64.tar.gz
./ddns-go -s install
#面板内放行9876端口

#安装onep
#放行60181端口
sudo apt-get install libmagickwand-dev
mkdir /opt/onep
cd /opt/onep
wget http://192.168.1.52:51515/main
wget http://192.168.1.52:51515/config.yaml

#安装探针

#配置转发Cloudreve

#安装Cloudflare tunnel

#安装tailscale
curl -fsSL https://tailscale.com/install.sh | sh
tailscale up --exit-node=
#安装docker
curl -fsSL https://get.docker.com | bash -s docker
#安装CloudflareSpeedtest
docker run -d --restart=always --name CloudflareSpeedtest-Slave \
-e MAX_MBPS=600 \
dp.rtc.ovh/genshinminecraft/cloudflarespeedtest-slave:v0.0.6

#安全性调优 https://dusays.com/737/

#安装pip
wget https://bootstrap.pypa.io/get-pip.py
sudo python3 get-pip.py --break-system-packages
nano ~/.bashrc
> alias pi='pip install --break-system-packages'

缺少依赖

1
-bash: ./artalk: cannot execute: required file not found
1
2
3
4
ldd ./artalk

# libc.musl-x86_64.so.1 => not found
sudo apt install musl

清理日志

1
sudo journalctl --vacuum-time=3d  # 只保留近3天的日志

初始化并挂载硬盘

1
2
3
4
5
6
7
8
9
10
11
12
13
14
15
16
17
18
19
20
21
22
23
24
25
26
27
28
29
30
31
32
33
34
35
36
root@ubuntu:~# sudo mkfs.ext4 /dev/vdb
mke2fs 1.47.0 (5-Feb-2023)
Creating filesystem with 122096646 4k blocks and 30531584 inodes
Filesystem UUID: 5bc06fda-bfdc-49b0-b370-f6fbea5534a0
Superblock backups stored on blocks:
32768, 98304, 163840, 229376, 294912, 819200, 884736, 1605632, 2654208,
4096000, 7962624, 11239424, 20480000, 23887872, 71663616, 78675968,
102400000

Allocating group tables: done
Writing inode tables: done
Creating journal (262144 blocks): done
Writing superblocks and filesystem accounting information: done

root@ubuntu:~# sudo mount /dev/vdb /mnt/hdd

root@ubuntu:~# df -h
Filesystem Size Used Avail Use% Mounted on
/dev/vdb 458G 28K 435G 1% /mnt/hdd


root@ubuntu:~# sudo blkid /dev/vdb
/dev/vdb: UUID="5bc06fda-bfdc-49b0-b370-f6fbea5534a0" BLOCK_SIZE="4096" TYPE="ext4"


sudo nano /etc/fstab

# 添加:
# UUID=xxxx-xxxx /mnt/hdd ext4 defaults 0 0


# 验证

systemctl daemon-reload
sudo umount /mnt/hdd
sudo mount -a

中文乱码

Linux解决nano中文乱码

关闭历史记录

Linux中禁用命令历史记录 - zhuxiaoxi - 博客园

apt-get临时使用ipv4

1
2
sudo apt-get -o Acquire::ForceIPv4=true update
sudo apt-get -o Acquire::ForceIPv4=true install <软件包名>

tcpdump: Couldn’t find user ‘tcpdump’

1
2
3
4
5
lsattr /etc/passwd
chattr -i /etc/passwd
vim /etc/passwd
添加tcpdump:x:72:72::/:/sbin/nologin
chattr +i /etc/passwd

Error: unknown pseudo-op: `.base64’

1
sudo apt install --reinstall binutils

提取光盘镜像

1
2
3
4
5
6
7
8
9
10
11
12
13
14
15
16
17
18
aaa@aaa:~$ lsblk
NAME MAJ:MIN RM SIZE RO TYPE MOUNTPOINTS
sr0 11:0 1 5.2M 0 rom
aaa@aaa:~$ sudo fdisk -l /dev/sr0
Disk /dev/sr0: 5.21 MiB, 5464064 bytes, 2668 sectors
Disk model: DVDRAM GT30N
Units: sectors of 1 * 2048 = 2048 bytes
Sector size (logical/physical): 2048 bytes / 2048 bytes
I/O size (minimum/optimal): 2048 bytes / 2048 bytes
aaa@aaa:~$ blkid /dev/sr0
/dev/sr0: BLOCK_SIZE="2048" UUID="2022-12-12-01-52-28-00" LABEL="EPSON" TYPE="iso9660" PTTYPE="mac"

aaa@aaa:~$ sudo umount /dev/sr0 2>/dev/null
aaa@aaa:~$ sudo dd if=/dev/sr0 of=disc.iso bs=2048 status=progress conv=noerror,sync
4704256 bytes (4.7 MB, 4.5 MiB) copied, 9 s, 520 kB/s
2668+0 records in
2668+0 records out
5464064 bytes (5.5 MB, 5.2 MiB) copied, 9.92761 s, 550 kB/s

usermod:未找到命令

bash: usermod:未找到命令 - InkYi - 博客园

Oracle移除监控程序

1
2
snap remove oracle-cloud-agent
snap remove oracle-cloud-agent-updater

使用DHCPv6获取ipv6地址

1
sudo dhclient -6 -v <网卡>

检查能不能收到路由器的 RA 广播

1
2
sudo apt install ndisc6
sudo rdisc6 enp1s0

开启ZRAM

1
2
3
4
5
6
7
8
9
10
11
12
13
apt install zram-tools
nano /etc/default/zramswap
# 输入
ALGO=zstd
PERCENT=50
PRIORITY=100
# EOF
systemctl restart zramswap

root@aaa:~# swapon --show
NAME TYPE SIZE USED PRIO
/dev/vda3 partition 976M 970M -2
/dev/zram0 partition 3.9G 0B 100

端口范围重定向

iptables
1
2
3
4
5
6
7
8
9
10
11
12
13
14
15
# IPv4
iptables -t nat -A PREROUTING -i eth0 -p udp --dport 20000:50000 -j REDIRECT --to-ports 10020
# IPv6
ip6tables -t nat -A PREROUTING -i eth0 -p udp --dport 20000:50000 -j REDIRECT --to-ports 10020

# 删除
# 1. 将-A换成-D
# 2.1 先查看,根据输出查看
Test:~# ip6tables -t nat -L PREROUTING -n -v --line-numbers
Chain PREROUTING (policy ACCEPT 371 packets, 55425 bytes)
num pkts bytes target prot opt in out source destination
1 17 8847 REDIRECT 17 -- eth0 * ::/0 ::/0 udp dpts:20000:50000 redir ports 10020
# 2.2 使用对应编号删除
ip6tables -t nat -D PREROUTING 1

执行某些命令临时使用代理

1
2
3
4
5
6
7
8
9
10
11
12
13
14
15
16
17
18
# 安装proxychains
sudo apt install proxychains4 # Debian/Ubuntu
sudo yum install proxychains-ng # RHEL/CentOS

# 配置 /etc/proxychains4.conf
# 在文件末尾修改为你的代理
[ProxyList]
socks5 127.0.0.1 1080

# 若出现某些兼容性问题,如:
#> select2: Bad file descriptor
#> Assertion 'close_nointr(fd) != -EBADF' failed at src/basic/fd-util.c:74, function safe_close(). Aborting.

# 还需要注释掉配置文件里的proxy_dns(禁用 DNS 代理)

# 实际使用时,在命令前添加proxychains4
proxychains4 curl https://example.com

1Panel内PgSQL启用timescaledb

  1. 更改镜像为timescale/timescaledb:2.29.1-pg18
  2. 在配置文件内修改shared_preload_libraries,添加timescaledb(记得取消行注释)